In this article, we'll be setting up Squid Proxy version 6.2 on Ubuntu Server 22.04.3 LTS because there is no compiled version of Squid 6.2 for Ubuntu 22 on Squid's official site, also we will be configuring Squid to enable SSL and ICAP.
So you need to know some concepts to understand what will do:
First, Squid is a proxy and cache server. It acts as a proxy by forwarding requests to the required destination and saving the requested content. If another server asks for the same information before it has not expired in the squid server, it serves the same range to the requester, therefore, improving download speeds and saving on bandwidth.
Squid proxy server supports caching of content requested through different protocols such as HTTP, SSL requests, DNS lookups, and FTP. This guide explains how to install and configure Squid proxy on Ubuntu 22.04.3.
Second, ICAP stands for Internet Content Adaptation Protocol. If content (for example: a file) you've requested over the internet to download or whatever, needs adaptation(some kind of modification or analysis), the proxy server sends the content to the ICAP server for adaptation and after performing the required tasks on the content, the ICAP server sends it back to the proxy server so that it may return the adapted content to the destination. This can occur both during request and response.
ICAP The Internet Content Adaptation Protocol (ICAP) is a lightweight HTTP-like protocol (request and response protocol), which is used to extend transparent proxy servers. This frees up resources and standardizes how new features are implemented.
You can use any ICAP server with a Squid proxy but in this article, we will use the ICAPeg server.
ICAPeg is an open Source multi-vendor ICAP server that scans files requested via a proxy server using ICAPeg ICAP server, ICAPeg is an ICAP server connecting web proxies with API-based scanning services and more soon. ICAPeg currently supports Virus Total, Cloudmersive, Clamav, and Clhashlookup for scanning files following the ICAP protocol.
Prerequisites:
Steps:
1. Configure Squid Proxy
- Download the sources on your server.
$ wget http://www.squid-cache.org/Versions/v6/squid-6.2.tar.gz
- Untar and the directory
$ tar xzf squid-6.2.tar.gz
$ cd squid-6.2/
- Update
$ sudo apt-get update && sudo apt-get -y upgrade
- Install additional header packages
$ sudo apt-get -y install \
libcppunit-dev \
libsasl2-dev \
libxml2-dev \
libkrb5-dev \
libdb-dev \
libnetfilter-conntrack-dev \
libexpat1-dev \
libcap2-dev \
libldap2-dev \
libpam0g-dev \
libgnutls28-dev \
libssl-dev \
libdbi-perl \
libecap3 \
libecap3-dev \
libsystemd-dev
- Compile your squid source to enable SSL and ICAP
- install the C compiler.
- install the C compiler.
$ sudo apt-get install build-essential
$ ./configure --prefix=/usr \
> --localstatedir=/var \
> --libexecdir=${prefix}/lib/squid \
> --datadir=${prefix}/share/squid \
> --sysconfdir=/etc/squid \
> --with-default-user=proxy \
> --with-logdir=/var/log/squid \
> --with-pidfile=/var/run/squid.pid \
> --with-default-user=proxy \
> --with-openssl \
> --enable-ssl-crtd \
> --enable-icap-client \
> --enable-ltdl-convenience
- building up-to-date versions of programs
$ sudo make
$ sudo make install
- Verify Squid Installation
$ squid -v
You should be able to see the following:

- Navigate to Squid's logs and modify folder ownership
$ cd /var/log
$ sudo chown -R proxy:proxy squid
- Start squid verify it running on the server
$ sudo squid
$ sudo netstat -tulnp
You should be able to see the following:

2. SSL Configuration In Squid
- Navigate to the Squid service folder & create a self-signed SSL certificate
$ cd /etc/squid
$ sudo openssl req -new -newkey rsa:2048 -days <certificate validity period in days> -nodes -x509 -keyout squidCA.pem -out squidCA.pem
Fill in the fields of the self-signed SSL certificate
Ex: $sudo openssl req -new -newkey rsa:2048 -days 365 -nodes -x509 -keyout squidCA.pem -out squidCA.pem
For one year.
- Create a trusted certificate to be imported into a browser.
$ sudo openssl x509 -in squidCA.pem -outform DER -out squid.der
- Import certificate file squid.der to client browsers by using any software tool that allows users to set up FTP servers or connect to other FTP servers in order to exchange files like FileZilla
- Add the Proxy IP and Port also this certificate to your browser.
- Add proxy
- Go to the browser that you will enable Proxy on in this example we will use "Firefox"
- Open Firefox then click this sign then "Settings"

- Write in the search box "proxy" then click "Settings"
- Select "Manual proxy configuration" then write HTTP Proxy IP and Port
Select the Also use this proxy for HTTPS. - OK

- Add Certificate
- Write in the search box " Certificate" and click View Certificates

- Click Import and choose the Certificate that you recently downloaded then click Open

- Select "Trust this CA to identify websites" and "Trust this CA to identify email users".

- OK, OK
- Write in the search box " Certificate" and click View Certificates
- Configure permissions to use the certificate file
$ sudo chown proxy:proxy squidCA.pem
$ sudo chmod 400 squidCA.pem
- Create a folder for future certificates.
$ sudo mkdir -p /var/lib/squid
$ sudo /usr/lib/squid/security_file_certgen -c -s /var/lib/squid/ssl_db -M 4MB
$ sudo chown -R proxy:proxy /var/lib/squid
- Add these lines to squid.conf file
$ sudo vim /etc/squid/squid.conf
- Search for http_port to add these lines after it .
/http_port [enter]
- Paste these
#http_port 3128
http_port 3128 ssl-bump cert=/etc/squid/squidCA.pem generate-host-certificates=on dynamic_cert_mem_cache_size=4MB
sslcrtd_program /usr/lib/squid/security_file_certgen -s /var/lib/squid/ssl_db -M 4MB
acl step1 at_step SslBump1
ssl_bump peek step1
ssl_bump bump all
sslproxy_cert_error deny all
- Reconfigure the squid file.
Note: This command is to be run every time you modify your squid.conf file
$ sudo squid -k reconfigure
You can verify your setup by navigating to a website from your client browser.
- Do normal browsing to check that is running.
- Check if the CA is enabled
- Click the "Lock" sign then click "Connection Secure" You have to see your CA name.
3. ICAPeg Configuration with Squid
- Verify ICAP is running
$ sudo netstat -tulnp
You should see it running on port 1344:

- Add these lines to squid.conf file
$ sudo vim /etc/squid/squid.conf
icap_enable on
adaptation_send_username on
adaptation_send_client_ip on
icap_service srv_resp respmod_precache 0 icap://127.0.0.1:1344/clhashlookup
#icap_service srv_req reqmod_precache 0 icap://localhost:1344/clhashlookup
adaptation_access srv_resp allow all
#adaptation_access srv_req allow all
icap_service_failure_limit -1
icap_preview_enable off
- Reconfigure squid
$ sudo squid -k reconfigure
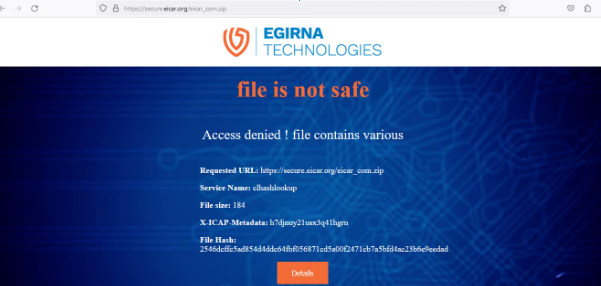
- Test with eicar_com.zip this a malicious file try to download it
You should see this: